These are a little explosion in your mouth and will liven up any party. Super simple to create. I found what I had been looking for in the grocers the other day... miniature graham bites! They are a new item from Keebler. Little squares of graham about an inch in diameter. Perfect for snacking and perfect to create little key lime bites to pop in your mouth :)
What Ya Need:
3 cups miniature graham cracker bites
1 cup white chocolate morsels
1 packet of Duncan Hines Frosting Creations (Key Lime)
1 cup of powdered sugar
What Ya Do:
1) Melt the white chocolate chips in the microwave on 45 second increments.
2) While they are melting, place the packet of frosting creations with the powdered sugar in a large plastic zipper bag. Shake to create a lime colored (flavored) sugar mixture.
3) Stir the melting chocolate chips to make sure all are melted.
4) Measure 4 cups of the graham cracker bites in a large bowl and stir the melted chocolate into bowl. Mix the cereal until all is well coated.
5) Directly transfer the coated graham bites into the zipper bag and shake. These do stick together a bit,,, so periodically, open the bag and pull apart the sticky cereals. Continue to shake until all are separated and coated.
6) When they are all coated, open the bag and take hand-fulls out of the bag and sift with hands, to release remaining sugar mixture from the graham bites.
7) Place into a bowl or serving dish. I added chocolate chips to the mix to give a taste of chocolate covered key lime pie. This is optional.
Tuesday, February 26, 2013
Monday, February 18, 2013
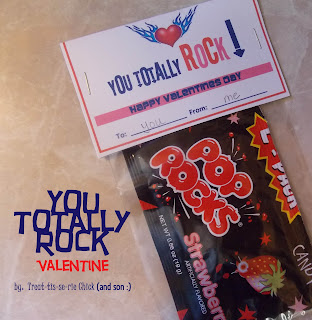
You Totally RoCk: Valentine
Such a cute Valentine:
Keebryn and I worked on this and they turned out totally "Rockin" ;)
They are fairly cheap to create and I have created a template for you, so that you can simply right click and save to your computer to paste into a blank doc. The image of the heart with wings was found by doing a Google search. The heart image is not mine, however, I designed the remainder of the Valentine.
What Ya Need:
Packs of Pop Rocks
Template for the Valentine
Stapler
Clear treat bags
What Ya Do:
OK... it's fairly simple.
1) Make sure you have your supplies and have enough for each kido you will be donating these to.
2) I would print off the template first... It is the image below. What you do is right click and download the picture. Then open a new blank document and place this into the page, twice. Only two will fit onto a page. I suggest that you print just one and practice the folding (below) before printing all needed. Practice the folding to ensure they are measured correctly.
3) As they are printing, let your kido write their Valentine's name and their name on the "To" and "From" lines.
4) Then it's folding time. As you cut these out, cut very close to the line on all sides, EXCEPT the top. Leave about 1/3 of an inch on the top. This will help line up the writing in the center as you fold. After they have written on the card, fold it by meeting the two ends and make a fold. Check to make sure it folds.
5) Now allow your kido to stuff a packet of rock candy into one of the clear bags.
6) Fold down the top until the top reaches almost the top of the rock candy.
7) Now place the folded card stradeling the bag and staple on both sides.
Super simple!
Chocolate Marshmallow Valentine Brownies
These are goodies and cutties.
Instructions are below.
What Ya Need:
1 jar marshmallow cream
2 packets of chocolate brownie mix
All ingredients called for in the mix
1 bag of round chocolate coated candies (I used "Sixlets")
What Ya Do:
1) Mix your brownie mix according to directions and place in a greased or sprayed pan.
2) Bake for apx. 10 minutes LESS than directed.
3) When timer goes off, use a piping bag or plastic sandwich bag to spread the marshmallow cream in a swirl (back and forth) pattern on top of the brownies.
4) Bake in oven for additional 10 minutes.
5) When the brownies are pulled from the oven, sprinkle with the round chocolate coated candies.
The colors make it perfect for Valentines, but these candies can also be found in pastels for Easter or other fun colors just to add some fun to your brownies. They do taste delish and they are super cute when cut into squares.
Monday, February 11, 2013
Chocolate Heart Pomegranate Cups
Are you looking for a heart-healthy treat that serves the purpose of also knocking out a craving for chocolate? This is it... these are simply delish!! These little chocolate cups are homemade and filled with pomegranate seeds and honey. Let's get started! Oh yeah... the kidos enjoy this thouroughly!
What Ya Need!
* 1 heart shaped cupcake or muffin pan (silicone)
* 1 bag of dark chocolate chips for melting
* 1 pomegranate
* Drizzles of honey
What Ya Do!
This is an elegant and simple snack. The most time consuming part is making the cups.
1) Melt about half the bag of chocolate chips in the microwave in 40 second intervals. I would use the darkest chocolate possible for the sake of heart health :) When the chips are melted...
2) Use a small, clean paint brush to dip into the chocolate and coat the bottom and sides in smooth strokes, of the heart shapes. Make an even layer.
3) Place them into the freezer for about 5-10 minutes and remove... they should be hardened.
4) Now add another layer of chocolate. This layer will harden quickly because the chocolate is cold in the mold... Make sure your chocolate is melted well in your bowl and carefully make smooth strokes to cover the heart again. Use upward and full strokes on the sides especially, to make the top smooth instead of crumply. (Uh, is that a real word?)
5) Place them in the fridge for a short time, until they are hardened again. This is for the final time :)
6) While they are hardening... work on your pomegranate. Get the seeds out of your pomegranate and place them on a towel to drain. You want them to be fairly dry because chocolate and liquid do not mix well.
7) Now, easily peel your heart cups out of their cases. They should come out easily by just folding the silicone back.
8) Fill each heart with enough seeds and drizzle a small amount of honey over the top.
9) You-re FINISHED!
I'm tellin' ya, I did not expect to enjoy these as much as I did. They are a great flavor combo and if you are heart health conscience, you will feel great munching on these for a snack or serving to a friend.
Thursday, February 7, 2013
You're DyNaMiTe: Valentine!
For Keebryn's Valentines Day party last year, we decided to make Homemade Dynamite Valentines! They turned out totally cute. We created a template for a rectangular shaped card with "You're Dynamite" typed on front, and printed them off the computer.
This is a great project to get the Kidos involved!
What Ya Need!!
*Coin Rollers (size nickle or quarter)
*Red spray paint
*Black yarn
*Black electrical paint
*Hot glue gun
*Taffy Candy (or some other type that will fit)
*Homemade Valentine card
What Ya Do!!
1) To make the dynamite...
Roll out newspaper to cover ground outisde. Use a glove, because you will have to hold the dynamite to spray paint. Find the designated amout of coin holders all the same size (the nickle holders worked best, but quarter ones will work also) and hold one by the side. Spray as you rotate with your gloved index in the coin holder. When it is fully covered with a coat of spray paint, stand it on it's end. You will repeat this for all coin holders. Let them dry apx. 5 minutes and spray again... You want to cover all coin detail with red.
2) When those completely dry, prepare your strings of black yarn. Cut each piece apx. 3 inches in length and glue with a hot glue gun, to the inside flap of the crunchable end. Now cut a small piece of electrical tape near the bottom, apx. 1/2 inch from botton, all the way around the coin roller. It's starting to look like a little dynamite :)
3) Now comes the good part... CANDY! We stuffed each with a strip of taffy candy, but whatever fits and works for your child will do great. After they are stuffed, fold the tip down on all sides, leaving the black yarn to hang.
4) Then, simply glue the finished dynamite stick to your homemade Valentine card! Your Valentine needs to have space on the top or side to place your dynamite and it should read "YOU"RE DYNAMITE"! Create a line for the child's name and a line for the name of the child donating the valentine.
Check out the video of Keebryn helping to make his valentine.... Super Duper Cuter! Hope you enjoy making these with your kidos!
Tuesday, February 5, 2013
Cinnamon-Hots White Chocolate Bark
Again, another super simple treat! That makes for a cute Valentines Day treat or gift.
What Ya Need!
1 Bag of White Chocolate Chips
1 Bag of Cinnamon Hots
*Wax Paper
*Zipper Bag
*Hammer :)
Uh.... yeah, that's it!
What Ya Do!
1) Prepare your Cinnamon Hots Candy by placing about half the bag in a small sandwich or freezer bag and grab the hammer. I used a small hammer because I thought it not best to destroy my kitchen island top :) Bust the candies into small pieces. Simple eh?!
2) Roll out a medium size piece of wax paper and tape it to a baking pan.
3) Now melt about half the bag of White Chocolate Chips in a microwave safe dish in the microwave for about 45 seconds and stir. Most of the chips should melt as you stir.
4) Pour your melted chocolate onto the paper and spread with back and forth strokes, until it's about 1.5 cm thick. Immediately sprinkle your crushed Cinnamon Hots candy over the chocolate and press lightly with your hand.
5) Place the pan in the refrigerator for about 20 minutes until hard.
6) To bust the chocolate into pieces, pull up the wax paper and hold 6 inches or so, above a flat surface and drop the paper with candy. It will break into pieces beautifully.
Eat up or wrap up and send to a friend. Happy Hot Valentines Day :)
Subscribe to:
Posts (Atom)